How to configure ARC between a Panasonic ST60 TV and a Yamaha RX-V375 receiver

In the Audio/Video world Audio Return Channel (a.k.a. ARC, but not to be confused with Objective-C's Automatic Reference Counting) is a way for a TV to output audio over the same HDMI cable already hooked up between it and a receiver. This renders a separate audio output cable redundant, resulting in a reduction of the cable mess usually found behind your A/V equipment.

In theory it's great, but actually getting it to work can take some configuration. Below are the steps I took to set this up so that the audio from the over-the-air TV channels I watch on my Panasonic ST60 TV would play through my receiver, which is a Yamaha RX-V375. I only mention the make and model of my equipment since it's the one combo I know these steps work for, although the procedure should be similar for other equipment.

- First you obviously need to connect an HDMI cable from the receiver's HDMI output to the TV's HDMI2 input, which is the input marked (ARC).

- Then set the TV to show the HDMI 2 input, so you can see the video output from the receiver.

- On the receiver's remote control press the Setup button to bring up the setup menu.

- Now turn the receiver's setting for HDMI > HDMI Control to On.

- On the TV's remote control hit the Apps button and go to the Viera Link app.

- Set Speaker Output to Home Theater.

And there we are, you can now enjoy the audio from TV broadcasts through the superior speakers hooked up to your receiver.

---

I put these instructions here mainly for the benefit of my future self as I will probably have to do this again at some point in the future, and don't want to spend time doing the research a second time. Perhaps someone else will also find it useful.

This article is based on information found in the ST60 eHELP Owner's Manual and the RX-V375 Owner's Manual, specifically page 18 and 59.

Thoughts on Phones

Apple may well be on the verge of disrupting the U.S. cellphone industry again, finally achieving what they set out to do initially – controlling the sale of the device and the customer experience by breaking the carrier contract lock-ins.

On a recent episode of The Talk Show, John Gruber and M.G. Siegler discussed how the original iPhone was sold to customers at full price in an effort to disrupt the long standing tradition of US providers subsidizing devices in order to lock customers into long contracts.

While the original iPhone was a success it was too pricey to manage to disrupt the US carrier business, so subsequent models have been sold subsidized with two year contracts. It seems to me Apple is about to make a second attempt at disrupting the carrier subsidized business model with the rumored introduction of a more affordable iPhone model to be sold straight to consumers mainly from Apple's retail stores.

AT&T benefited from being the sole iPhone provider in the US market for the first few years. This time I believe T-Mobile, with their newly announced "Un-Carrier" strategy focused on non subsidized plans with unlimited data, stand to gain should this lower cost iPhone model be introduced in the US. The lure of a comparatively affordable monthly plan and the availability of a lower cost iPhone could turn a portion of the US cellphone market towards paying for device and plan separately in order to avoid being locked into contracts. This allows the customer to upgrade their device on their own schedule, a behavior which is common in large parts of Europe and elsewhere around the world.

If US customers start transitioning away from the contract model T-Mobile is the only larger provider currently giving them the opportunity to do so. Were I not locked into another year with my AT&T contract I would go for T-Mobile's Simple Choice Plan which includes unlimited everything for $50/month*. Unless the market changes significantly in the coming year chances are I'll do exactly that when my contract is up.

---

*The $50 plan includes 500 MB of data at 4G speeds, which should be enough for anyone who is on wifi frequently. After the first 500MB the data speed is throttled, but no extra charge is incurred.

DISCLAIMER: This is all speculation based on the prevailing rumors. I have no inside knowledge of Apple's business strategy.

The Undercover MacBook

For someone in possession of a stolen computer it is no longer enough to look over their shoulder while using it, these days the computer itself can turn informer and lead the police straight to them.

This summer I had my MacBook Air stolen from a hotel room while vacationing in Las Vegas. Along with the machine, roughly 1500 photos taken during the preceding three week road-trip through California and Nevada were gone. Thanks to my heavy reliance on the cloud storage service Dropbox I lost almost no other data, despite having used this as my main machine for the last couple of months. I would have been devastated had I for example lost the source codes to my apps.

I promptly made a report of the theft to the Las Vegas Metro Police Department where they let me know, in no uncertain terms, that I should not expect to see my computer again. They did however assign a detective, one Russel Lee to the case.

A Ray of Hope

Despite the Police's pessimism, I maintained a ray of hope. After buying the laptop I had invested in a piece of software called Undercover to keep my MacBook safe. Described as a “revolutionary theft-recovery software” it would supposedly provide me with all the information needed to recover the computer in case it was ever stolen.

Using my iPad I logged on to the Undercover recovery center website and marked my computer as missing — telling the software to start tracking it.

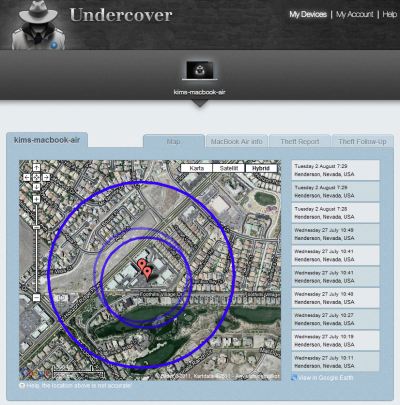
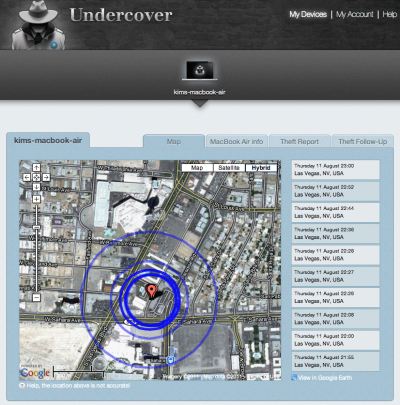
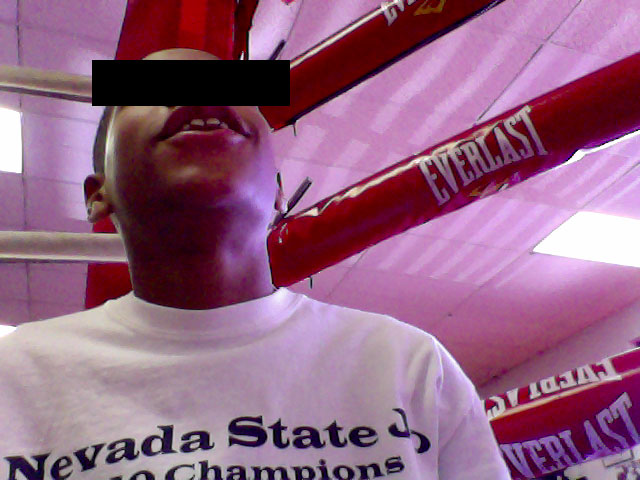
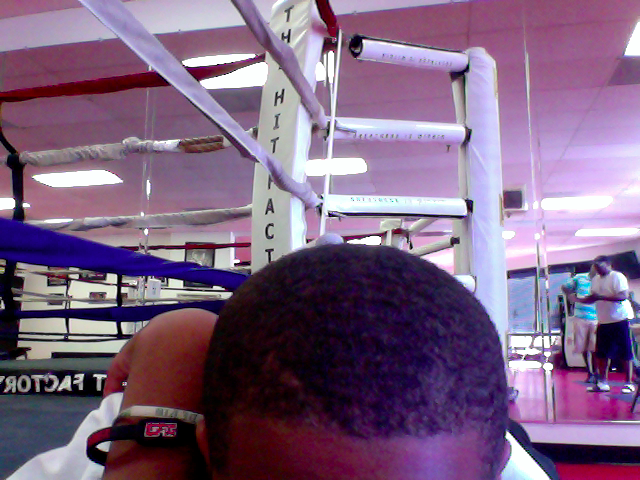
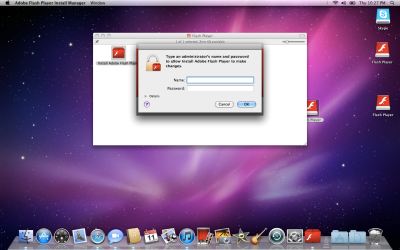
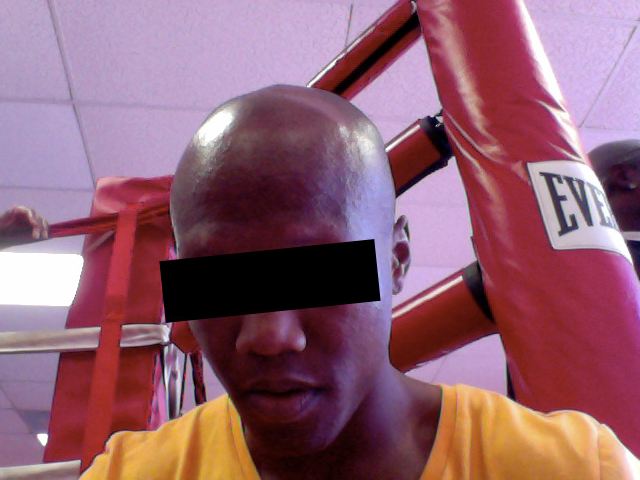
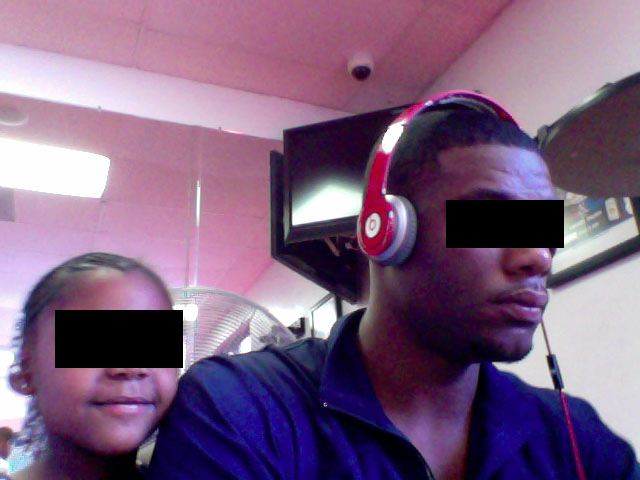
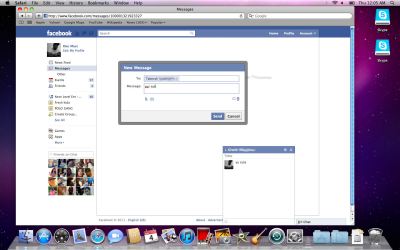
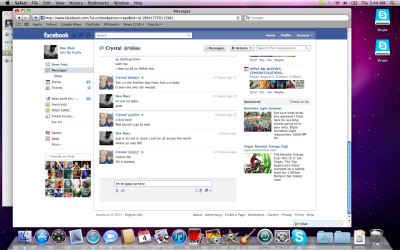
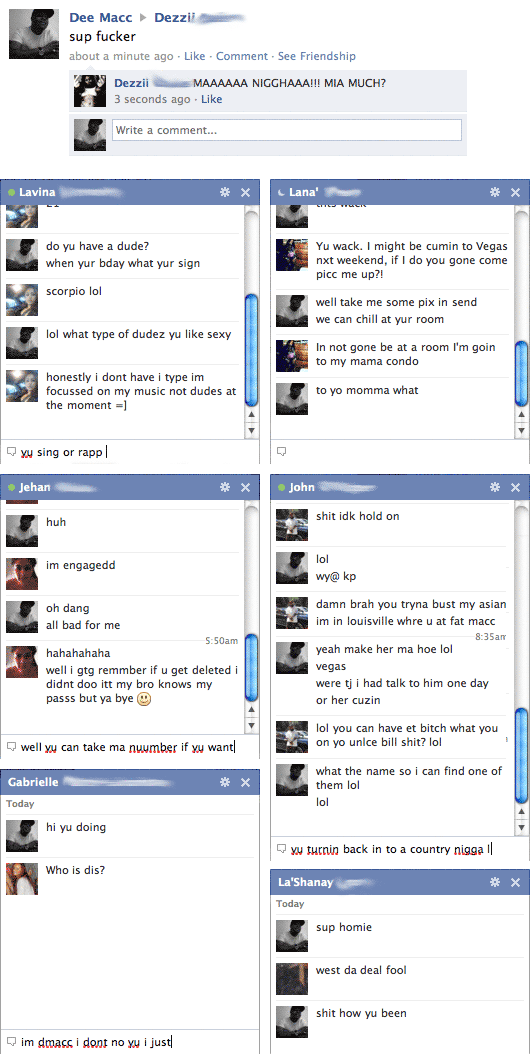
Things were quiet for several days. I had already made my way back to Sweden and the ray of hope was starting to fade when I finally received an e-mail proclaiming that the computer had been used to access the internet and that Undercover had started tracking it. As promised, I was provided with webcam photos, screenshots, the computer’s IP address, and an approximate location!

I could see that the person using it had logged in to the computer’s guest account and had connected to a Wifi network. While it’s no fun seeing someone using your computer without your consent, I was nevertheless relieved that the tracking software seemed to be working.

Hello there, what are you doing with my laptop?

Oh, you’re hitting up women on Facebook. Carry on then.

The location in Henderson, Nevada, wasn’t exact enough for the police to figure out which house to visit. Frustratingly, I also found out that it takes the police all of 60 days to get the subscriber information for an IP address.

Profiling the User

During the following weeks I was informed whenever the computer was used and I tried to piece together the information I could gather from the screenshots in an effort to point the police in the right direction. I quickly found out the user’s Facebook profile and Skype account, but he used the alias Dee Macc and I couldn’t figure out his real name and address. His Facebook profile did mention that he graduated from LA High class of 2007, so that prompted a search of their online yearbook, alas to no avail.

Eventually a bit of luck, he typed his phone number into a couple of chat windows while trying to pick up women. But according to whitepages.org the number he gave is registered to a 60 year old person in Los Angeles. Not the age you would expect of someone who uses the phrase “im not no baby yeah”. Also, according to his Facebook profile Dee Macc was born on February 5th 1990 making him 21 years old. Thus, the registered owner of the phone number is definitely not our man.

It looked as if my machine was making lots of new friends as other people also started using it now and then, always from the same location in Henderson, NV. Some of their Facebook profiles were under their real names. One of those people, let’s call him B., turned out to be the owner of a Las Vegas boxing gym near Las Vegas Boulevard. Another user was his son D., whom I could tell from his Facebook account is a promising young boxer.

As time passed and more information came in I forwarded everything to the police, but they still didn’t have enough to take action.

The Retrieval

One late evening as I was ready to turn in for the night I was alerted by Undercover that the computer had moved to a new location. At first I thought this was bad news since it meant the IP address subpoena would have to be restarted from scratch, but I couldn't have been more wrong. The location was reported to be close to Las Vegas Boulevard, and the webcam photos showed D. hanging out in a very nice boxing gym. For the first time in weeks I knew exactly where it was!

I sent a quick e-mail to Detective Lee.

New and actionable information.

D. XXXXX is at the time of me writing this using the computer at the XXX XXXXXX Boxing Gym, XXXX Paradise Road, Las Vegas.

I had a reply just minutes later

Perfect! Thanks, I’ll run over there and see.

As webcam photos continued to come in over the next few minutes, I forwarded them to Detective Lee to help him find the right people in the gym. Then all of a sudden the computer went offline. A worrying turn, but I maintained hope as the last screenshot contained an intriguing Facebook update.

“ugghhh i hate police officers…makes me wanna qweef”

Moments later the e-mail I had been hoping for arrived from Detective Lee.

I have your computer! Good Job!!

High fives all around! The Undercover software had delivered on its promise, and combined with the swift action from Detective Lee it had recovered my MacBook Air.

Conclusion

As I’m writing this I have just taken delivery of the computer from the Las Vegas Metro Police Department evidence vault, and I was glad to see my road-trip photos remain safely stored on the disk. Detective Lee had already mentioned that my user account was still on the computer which lead me to believe they would be there, but it’s good to have it confirmed.

After 10 weeks of being separated from my computer I can finally get back to app development and get som delayed updates out the door — once I'm done organizing the road-trip photos of course.

Lessons learned

I was lucky in having been sufficiently prepared before having my computer stolen. Take these lessons to heart, should it happen to you;

  • It’s a good idea to take the precaution of having theft-recovery software installed on your computer.
  • It is vital to have your computer’s serial number available when filing the police report, without it you may not be able to legally prove it’s yours even if you are able to track it.
  • Set up a guest account so the thief can log in and connect to a network, or tracking will not work.
  • Lock your user account whenever you step away from the computer so that a thief can’t access your files and won’t have administration privileges to the system.

This ordeal has made me consider taking a couple of additional measures now the computer is back in my possession.

  • For insurance reasons always make use of the hotel in-room safety box, no matter how insecure.
  • Set a firmware password, a simple measure which will make it impossible for a thief to wipe the system and reinstall the operating system, thus removing the tracking software.
  • Install some software to allow me to siphon off data in the background so that I could have copied over my photos while the computer was connected to the internet but not under my control.

Undercover is available from Orbicule. I highly recommend you install it on your Macs.

Excerpts of collected evidence

Below are some of my favorite screenshots and webcam photos selected from the huge amount of data I received from Undercover during this episode.

Installing Flash? Not on my computer you don’t!

Some webcam photos of people hanging out with my MacBook Air.

“yu cute” — Dee Macc using the shotgun approach on Taberah and Gisele.

“im not no baby yeah” — Dee Macc's failed attempt at sounding mature.

Fine prose from Dee Macc and friends.

NSZombies and the Program received signal: “EXC_BAD_ACCESS” exception

[The following article applies to Xcode 3.x]

Even when following the memory management techniques explained by Steve "Scotty" Scott I sometimes run across my most dreaded runtime error;

Program received signal: “EXC_BAD_ACCESS”

This happens when you try to access an object that has already been released. Sadly the error message doesn't give you any information on what object you were trying to access, but luckily you can call up some zombies to help out.

Control-click the Executable you are trying to debug and select Get Info

Use the + button to add a new environment variable called NSZombieEnabled and set its value to YES.

When you run your app with this variable enabled, all deallocated objects are kept in memory and you will get a better error message in the console once one of them receives the unexpected call which crashes your app.

The debugger stack trace can at this point help you figure out exactly where in you code the problem occurred. Hovering the mouse cursor over the offending object will indicate that it is indeed an NSZombie.

Now that you know which object was accessed after being released you should be able to squash the bug in a few minutes by making sure to apply the memory management techniques correctly on it.

Make sure to uncheck the NSZombieEnabled variable before you ship your code, otherwise no memory is ever freed from you app. If you forget to uncheck it all released objects will be kept around in a zombie state, consuming your memory and eventually getting your app force killed by the system.

Since it is important and you need to remember this, say the following phrase out loud;

"I will not ship zombie infested code to my customers."

The iPad case for explorers and adventurers

I'm pretty sure I never saw Indiana Jones use an iPad, but had he owned one he would certainly have kept it in a Vintcase. Just look at the thing, it radiates pure awesomeness.

When folded up, the wrap-around string keeps it snugly closed, ready to go explore the world.

The Vintcase is made in Spain from high quality cowhide leather. This card matching game is made in Sweden from the absolute highest quality digital bits.

There's no need to hold your iPad or prop it up against anything when watching a movie or using it for recreational gaming. The Vintcase can stand independently on any level surface.

The case was delivered lovingly wrapped with a note saying "I hope you like it" – that's how you make a good first impression! The whole thing just oozes class and I certainly do like it.

If you are interested in getting one of your own, take a look at Vintcase.com for more photos and information.

Full disclosure: I am not affiliated with Vintcase in any way except for being a satisfied customer.

"Barkeep, this round is on me"

How you can do good toward your fellow man, and end up with some quality apps for yourself.

-----

Update March 1st:

I sold 341 apps during February. After subtracting income taxes a donation of $143 was made, providing 20 years worth of clean water for 7 people.

My thanks to all who helped by purchasing apps. The charity runs through March, you can donate directly at http://developersagainstpoverty.org/.

-----

Living in a town which sees more than 100 rain days per year, I find it hard to imagine what it must be like not to have access to clean and safe drinking water. Sadly there are people on this planet for whom clean water is an unattainable luxury.

Unsafe water and a lack of basic sanitation kill more people every year than every form of violence on the planet, including the wars raging around the globe.

This is a fact I learned after tuning in to this week's episode of the chat show iDeveloper Live, where Scotty (the show host) has launched Developers Against Poverty — a campaign asking software developers to help bring clean water to areas of the world that lack it.

After hearing about this initiative, and then being inspired by Baked Ham Games' pledge to donate a percentage of their app sales, I have decided to support the effort as best I can.

Therefore;

I hereby pledge to donate 100% of my February profits from the app store to the cause championed by Developers Against Poverty.

The donation will be made during the first week of March, as soon as the February sales numbers are in.

So if you are at all interested in football (soccer if you're American) or perhaps want to study some Japanese, I hope you will join me in supporting this noble cause by buying some apps, which coincidentally are all currently on sale.

Even if none of my apps appeal to you, do consider donating directly to the Developers Against Poverty charity campaign.

Installing Leopard on the G4 Cube

The PowerMac G4 Cube, arguably the coolest computer on planet Earth, is not supported by operating systems later than Mac OS X 10.4 Tiger, but there are many reasons you may want to run a later system. For me the main incentive to upgrade was that Apple dropped Tiger support with the release of iTunes 10, which means a Cube on 10.4 can not partake in the wonders of Home Sharing.

The minimum system requirements for installing Leopard on a PowerPC based Mac is an 867 MHz processor and 512 MB of RAM. The memory requirement isn't really a problem since the Cube supports up to 1.5 GB, and you wouldn't want to run Leopard on any less than 512 MB anyway. The processor speed requirement, however, is a problem since the fastest (unmodified) Cube runs at 500 MHz. Luckily there is a way to fool the Leopard installer's system requirements check by temporarily modifying the processor speed reported by the firmware.

Back up your Tiger

First off you'll want to create a bootable backup of your internal disk on a firewire drive. Do this using SuperDuper! or a similar tool, and make sure you can really boot from the backup drive.

No really, do not go on until you have successfully booted from your backup and made sure it works.

Set the startup disk

Put your Leopard installation disk in your DVD slot, or copy it onto a firewire drive if your Cube can't read DVDs. Then set the installation disk as your Startup Disk in the System Preferences so that on next restart your Cube will boot from it and start the installation.

Modify Open Firmware

Restart your Cube, and hold Cmd-Opt-O-F during boot to enter the Open Firmware prompt. You will now temporarily set the reported CPU speed to 867 MHz and then continue booting. To accomplish this you will type some commands on the prompt, Open Firmware will respond with an 'ok' message after each understood command. The reported speed will revert back to the original value after next reboot.

For single CPU systems type the following three commands exactly as shown.

dev /cpus/PowerPC,G4@0

d# 867000000 encode-int " clock-frequency" property

mac-boot

For dual CPU systems use the following five lines.

dev /cpus/PowerPC,G4@0

d# 867000000 encode-int " clock-frequency" property

dev /cpus/PowerPC,G4@1

d# 867000000 encode-int " clock-frequency" property

mac-boot

Continue with the installation normally, and eventually end up with a Leopard Cube.

Thanks to MacRob on CubeOwner.com for turning me onto this solution.

Retro gaming on iPad, for iOS developers

MADTV and Gabriel Knight running in dospad on the iPad

MADTV and Gabriel Knight running in dospad on the iPad

Sometimes it's good to take a break from coding, and what's more relaxing than running some retro games on your iPad?

Getting DOS onto iPad

Some time ago a DOS emulator called iDOS briefly made it into the App Store, but it was already long gone when I heard of it and tried to download it. As luck would have it the source code for the app is available under the name dospad from Google Code, so any registered iOS developer can build it using Xcode and run it on their iPad.

I believe iDOS or dospad is also available for jailbroken iPads, for those who are not registered developers but are OK with jailbreaking their device.

Installing games

With dospad you get a fully functional DOS system for your iPad. There is mouse support and sound support, making it brilliant for some retro gaming. If the games are mouse driven you can even go full screen for a very immersive experience.

Sierra's adventure game Gabriel Knight is one of my all time favorites, and since I no longer have a floppy disk drive on my computer I downloaded it from an abandonware site called The House of Games, where there's a large selection of old DOS games.

With dospad installed on your iPad, you can drag files into it using iTunes. Just go to the iPad's Apps tab and select dospad under the File Sharing header.

Dospad comes with an unzip utility so once you have transferred the zip file with your game you can use the DOS command prompt to create a directory and unzip the file into it.

For Sierra games you then run install.exe to select your sound options. I selected Soundblaster Pro which seems to work well.

Launch the game by running sierra.exe.

Mouse controls

Obviously, this being DOS, you don't use it like a standard touch screen. Instead you control a mouse cursor on screen in the same manner you would using the touchpad on your Macbook. Tapping the screen left clicks at the position the cursor points to.

You can play either in portrait or landscape mode, as well as full screen.

Happy retro gaming, and make sure to save your game often.

Add your own teams to Starting 11

Version 2.0 of Starting 11 was just submitted for App Store review and should be available on the store shortly.

New features

The new version lets you add any number of your own favorite teams and players.

Formations you prepare are stored for future modifications, meaning you don't need to start over from the beginning the next time you want to prepare a starting eleven.

How to get it for free

Version 2.0 will be priced at $2, but it is a free upgrade for users of version 1.0. So if you haven't yet downloaded Starting 11 you can get 2.0 for free by acting now, before it goes online at the store.

App store link

The evolution of an iPhone app interface

I recently released Starting 11, an iPhone app in which you can pick your own football team line up and share it via e-mail and Facebook.

From idea to app store submission took about 10 evenings of work. The lions share of that time was spent perfecting the user interface. Below are the design iterations from idea to App Store release, click the images for full versions.

Since I had the idea for this app just before the FIFA World Cup started, I quickly decided to use the Xcode template "Navigation-based Application" to simplify development, hoping to get it published before the World Cup had finished. By focusing on polishing the pitch view, which would be the view where the user spends most of his time, I figured I would get the most bang for my efforts.

Initial idea sketch

Using the brilliant and free Adobe Ideas app on my iPad i quickly sketched the basic UI and zoomed the resulting image to match the size of my iPhone. This gave me a feel for the size of the UI components, allowing me to decide that it would be feasible to have a full football team on screen at once.

Grass and scoreboard

To generate the grass for the pitch I followed Andrew Houle's Photoshop tutorial, ending up with a huge image of grass texture. My brother graciously provided me with the chalk lines marking the pitch and with the scoreboard graphic which has a nice detailed mesh effect only visible with the extra resolution available on the iPhone 4.

Player kits

I had decided to represent the players on the pitch by having their jerseys show the number on the back, the name would appear beneath. My first effort used a combination of rectangular UIViews to create the illusion of the jersey. I was hoping this would allow me to save time, but it just didn't look good enough to match my vision for Starting 11.

I had to implement my own UIView subclass to handle drawing the player using vector graphics. This allowed me to create something that more closely resembled a jersey.

I also decided to add a dark background to the player names.

After using the app in this state for some time I decided that the shoulders needed to be more rounded, and that a black outline around the player added some needed contrast, especially important when using the application outdoors in the sun. For the same reason the color behind the player name was darkened.

I also added a small line to indicate the separation of the player's legs, without which it looked like the players were wearing skirts.

Finally the flags for all countries had some shine added to them, then the Share button was added and I decided that instead of having the team's name appear on screen twice the navigation bar should contain the application's title.

And there you have it, the UI of version 1.0 of Starting 11. What do you think? What would you change?

Looking forward

After the World Cup is done and we have a new world champion team, the next step will be to add the possibility for customers to add and modify teams. This will make the app useful for the club competitions that start up after summer.

Regarding the iPad I think Starting 11 would be a wonderful fit for the larger screen, so I plan to make it a universal app that supports both the iPhone and the iPad form-factors.

Until these steps are done the app will remain free. I will eventually start charging.

Starting 11 for iPhone in HD

It has yet to be listed in the App Store, but I'd like to introduce you to my latest effort. Starting 11 is an app developed for the ongoing FIFA World Cup.

You choose which team you want to manage and position the players on the pitch in the formation you prefer. You can then share the resulting lineup via e-mail or Facebook.

Starting 11 has been in review at Apple for a over a week already so it should hopefully go live shortly.

Retina Display ready

This is my first attempt at an app supporting the full resolution of the Retina Display of iPhone 4. The difference in detail level is simply astounding, as you can see for yourself below.

Click the image for full size comparison.

On the iPad App Store from day one

I have just learned that my first iPad app has been approved by Apple and will be available from the App Store on opening day.

A Memory Game gives you the opportunity to practice your memory by trying to find and match pairs of cards together. The first version features the two card decks Flags and Symbols.

Once the store is online you will be able to download A Memory Game for free [iTunes link].

iPhone Video Output

There are a couple of options available when preparing to perform a demonstration of an iPhone app to a larger group of people. All these options have flaws, however. The "gather around" method, for example, doesn't work well for groups of more than a few people. Any more and you would ideally want to project the iPhone screen contents onto a big screen.


The "iPhone simulator method" is probably the most used method. It's simple to set up but limits your app navigation to the mouse, making multitouch gestures difficult to perform. Also, there is no way to show off accelerometer functionality like "shake to undo".
The "camcorder method" avoids the simulator's issues, but can be a hassle to set up. It also restricts your movement as you have to make sure to keep the device on screen and avoid reflections as best you can.

Doing it Steve's way
Why don't we take a page out of Steve Job's playbook and mirror the iPhone screen directly from the device onto the big screen?
Sadly this is not straight forward. So far only the iPod application supports video output via Apple's AV cable, at least that's what I thought until I stumbled upon Rob Terrell's iPhone App Video Mirroring blog post (go read it now, I'll wait).

Using the private MPTVOutWindow class in the MediaPlayer.framework API, Rob's code mirrors the iPhone screen onto the AV cable. For demonstration purposes this is a great solution, but being based on a private API it should not be left in the app when submitting it to the App Store.

Originally the code did not support on-the-fly orientation changes and touch indicators, both of which I needed. Thanks to Rob posting the source code I was able to implement these changes and have since submitted the updated code back to him, although I haven't heard back after doing so.

Get your hands on the code
In the spirit of sharing I have prepared a sample project, TvOutputSample, which shows you how to add video output to an Xcode project. This is the application shown in the video above, it should build and run out of the box, using iPhone SDK 3.0.

Download the code: TvOutSample.zip
[UPDATE: The project has moved to github]

I should mention that since the video mirroring is software based it affects application performance somewhat. On an original iPhone 10 fps works well, on an iPhone 3GS I have had no problems running at 20 fps. The fps setting is near the top of the UIApplication_TVOut.m file, do your own tests to see what works best for your app and hardware.

The current version (as of October 2009) of the code does not support OpenGL video output.


How Apple can improve iPhone scrolling

I want to mention a UI issue I have with the iPhone OS implementation of scroll indicators, the unobtrusive bars that appear on the right side of the screen when scrolling through a list.

My hand obscures the scroll indicator

Like most people, I tend to use my right hand to interact with the iPhone. This means that my hand obscures a large part of the extreme right of the display, making it hard to see how far down the list I have travelled.

Proposed UI enhancement

My proposal is to have the scroll indicators appear on both sides of the screen.

The effect is illustrated in the photoshopped screenshot below, based on the settings screen in my Hiragana application.

Note how the scroll indicator appears on both the left and right sides

Note how the scroll indicator appears on both the left and right sides

Is this really a problem?

This issue tends to bother me the most while reading longer articles at RoughlyDrafted Magazine or Daring Fireball. I often want to quickly check how far I have to go, in order to decide if I have time to finish the article or if I should save it for later.

In these cases the scroll indicator tends to be pretty small and a fair distance down the screen, right where I am least likely to easily see it.

What about panning?

Mobile Safari, and other applications that allow you to pan around a larger view in two dimensions use a horizontal scroll indicator in the lower part of the screen. This can can also be partly obscured by your hand, and should thus be supplemented by a scroll indicator across the top of the screen.

Speculation on the scroll indicator's background

I suppose Apple's decision to limit the scroll indicators to the right and bottom of the screen is based on how scrolling works in the classic desktop applications where scroll bars remain on screen whether in use or not.

To minimize wasted screen real estate and avoid UI clutter, it makes sense in a desktop application to chose a single place to present the scroll bar. The standard seems to always have been to place it on the right, and along the bottom for horizontal scrolling.

However on the iPhone scrolling works differently. There is no screen real estate wasted by showing the indicators on both sides since they are only visible while you are scrolling.

The appeal

So Apple, please add support for dual scroll indicators. It just makes sense.

Hiragana, Katakana and the WWDC Wall of Apps

At WWDC there was a really cool wall of apps, which used 20 Apple Cinema Displays to show the icons of the 20,000 most popular iPhone apps, and illuminate them whenever they were downloaded from the App Store. Pretty neat!

Greg Pascale, a student at Brown University, made a Photosynth of the whole wall, allowing us to study it in detail. I took the opportunity to look for my applications, and found them at the far right of the wall.

I can hereby claim having had a presence at WWDC '09. Sweet!

10 000 App Store Downloads

As of the latest available weekly sales report on iTunes Connect, the number of downloads for my three iPhone applications have passed 10 000!

The apps are Hiragana Lite (free), Hiragana ($2.99) and Katakana ($2.99).

I am amazed at the success of these admittedly simple applications and would like to extend my sincerest thanks to my customers, especially those who have left feedback and pushed me to improve the apps.

The numbers

(click to view large version)

(click to view large version)

The vast majority of downloads have naturally been for the free version Hiragana Lite. However with just under 10% of the total downloads, the paid apps have together been able to edge over the 1 000 downloads line. This is way beyond my wildest hopes.

The explosion of Hiragana Lite downloads makes the sales lines for the paid applications look almost flat. But if we disregard the Hiragana Lite downloads and look closer at the sales of the paid apps, combining their numbers, we notice something interesting.

Don't let the changed scale on the y-axis in the following graph confuse you, it goes to 1000 instead of the 9000 shown in the graph above.

Before the release of the free version the sales trend had been declining after the first few weeks. It looks like it was about to go flat right around 500 sales. However since Hiragana Lite has been available sales have picked up and have held remarkably steady.

My conclusion to this is that it is a very good idea to make a free version of your app available, letting potential customers try before they buy.

A second conclusion is that I should probably set aside some time to develop a few more apps.

---

*Note that these numbers do not include updates, only new customer downloads are counted.

Using Mono for .NET development on the Mac

Yesterday I decided to install Mono onto my MacBook to enable .NET development. Below I have listed the steps I took to accomplish compiling and running a Windows Forms hello world style application and packing it into an app bundle so I can run it by double clicking the icon.

The reasons for doing this are twofold;

* I spend most of my time at work professionally developing .NET applications using Visual Studio, so obviously I'm interested in using .NET also on the Mac.

* I'm thinking of writing an experimental Push Notification Service backend in .NET and would rather avoid having to launch Windows to do this.

Requirements

Leopard (Supposedly works on Tiger as well, but then you need to install X11 to make Windows Forms applications work)

Installation

1. Get Mono for Mac from the Mono Project website. I grabbed version 2.4, the latest stable version as of this article's publication.

2. Run the installer. Mono installs under '/Library/Frameworks/Mono.framework'.

Hello World on the command line

3. Compile a command line hello world tool:

hello.cs file contents

// Compile with %> gmcs hello.cs
using System;
public class HelloWorld
{
static public void Main ()
{
Console.WriteLine ("Hello Mono World");
}
}

Compile using the 'gmcs hello.cs' terminal command.

4. Run using the 'mono hello.exe' terminal command. The 'Hello Mono World' message should be printed.

Windows Forms Hello World

5. Compile a Windows Forms hello world app tool.

helloforms.cs file contents

// Compile with %> gmcs helloforms.cs /r:System.Windows.Forms.dll
using System;
using System.Windows.Forms;
public class HelloWorld : Form
{
static public void Main ()
{
MessageBox.Show("Hello Mono World");
}
}

Compile using 'gmcs helloforms.cs /r:System.Windows.Forms.dll'.

6. Run using the 'mono helloforms.exe' terminal command, and if all is well a message box should be displayed.

Creating an app bundle

7. Use MacPack to package the .NET assembly into an app bundle, which can be launched from the Finder.

'macpack -n:HelloForms -a:helloforms.exe -o:. -m:winforms' on the command line.

8. Launch the app bundle HelloForms.app from the Finder to make sure it works.

That's it really. You are now ready to start development on your enterprise level .NET project using Mono on your Mac.

Additional tips

* MacPack has a really good man page documenting its use.

http://linux.die.net/man/1/macpack, or just 'man macpack' on the command line.

* Simplified compilation using pkg-config

Note that using pkg-config (see if it's setup on your system by running 'pkgconfig' on the command line) you can compile the forms app using 'gmcs helloforms.cs -pkg:dotnet' instead. Not a big difference in this example, but not having to list all needed assemblies will help when compiling more complex projects.

For .NET 3.5 compatibility, you would use the -pkg:dotnet35.

To set it up, add the following line to the '~/.bash_profile' file, if the file does not exist create it:

export PKG_CONFIG_PATH=/Library/Frameworks/Mono.framework/Versions/Current/lib/pkgconfig/

References

Windows.Forms and Mac OS/X
http://oepapel.blogspot.com/2005/04/windowsforms-and-mac-osx.html

Mono Basics
http://mono-project.com/Mono_Basics

Customizing Terminal when Compiling Mono apps
http://dotmac.rationalmind.net/2008/12/customizing-terminal-when-compiling-mono-apps/

Archive for the 'firefox' Category
(contains info about pkg-config)
http://wp.colliertech.org/cj/?cat=9

iPhone SDK development on multiple computers

Sometimes it's good to be able to use several computers to develop your iPhone app. In my case my main development machine is the iMac, but summer is coming up and I may not want to stop developing just because I go out of town. Luckily I have a MacBook, on which I have also installed the iPhone SDK.

In order to test on the device when I develop using the MacBook I have to move my certificate, private key and provisioning profile to it. Here's how I do that.

1. Launch Keychain Access on the iMac (main development computer).

2. Under the Keys category I Ctrl-click the private key that has the certificate for 'iPhone Developer: ' attached to it.

3. In the context menu select 'Export ...'.

4. When saving provide a password, which will be required for importing on the other computer.

5. A .p12 file was saved, transfer it to the target computer.

6. Grab the development provisioning profile (either by downloading from the iPhone Program Portal or by grabbing the right one from ~/Library/MobileDevice/Provisioning Profiles/) and transfer it to the target computer.

7. Double click the .p12 file on the target computer. If you provide the correct password the key and certificate will be installed into the Keychain on the target computer.

8. Drag the provisioning profile onto the Xcode dock icon.

The application can now be installed on the device from the target computer, which in my case is the lovely black MacBook.

Not announcing the Kinetic Battery Charger app

I had hoped to announce the release of my latest iPhone application on the App Store, sadly that's not happening here.

Lately I've been experimenting with the built in accelerator and wanted to put the code to use in an actual app, so I decided to make an app which simulates charging the phone battery when you shake it. Like you would shake your kinetic wristwatch to keep it running.

I designed a battery graphic and added a bar that grows when the phone is shaken to simulate charging. I thought it turned out really well, and the people I've shown it to have said it's hilarious even though they weren't fooled for long.

I submitted the application as a freebie to the Entertainment category on the App Store, but it turns out Apple's reviewer didn't find it entertaining. Instead I received a letter stating that it wouldn't be allowed on the store.

Unfortunately, your application, Kinetic Battery Charger, cannot be added to the App Store because it uses standard iPhone screen images in a non-standard way, potentially resulting in user confusion. Changing the behavior of standard iPhone graphics, actions, and images, or simulating failures of those graphics, actions, or images is a violation of the iPhone Developer Program agreement which requires applications to abide by the Human Interface Guidelines.

Now this is obviously a form letter as I am not using any standard iPhone screen images at all, except for the info-button which works as expected by revealing a settings screen. I sent a reply stating this fact but have not heard back.

I also spent a few hours poring over the Human Interface Guidelines in search for anything explaining why my application would not be acceptable but came up empty handed.

I find it a little frustrating that the feedback you get from the App Store reviewers doesn't contain any actual information about what they are objecting to. How hard can it be to take a screenshot of the application and draw a circle to point out the offending piece?

Oh well, back to updating the apps I already have on the store, that will hopefully be time better spent.